반응형
# 스프링 부트에서 카프카를 연동하기
- 기존 개발된 게시판 애플리케이션에서 카프카를 연동해보자.
1. Controller 및 Service 생성
2. 로컬환경에 kafka 설치 (docker 환경)
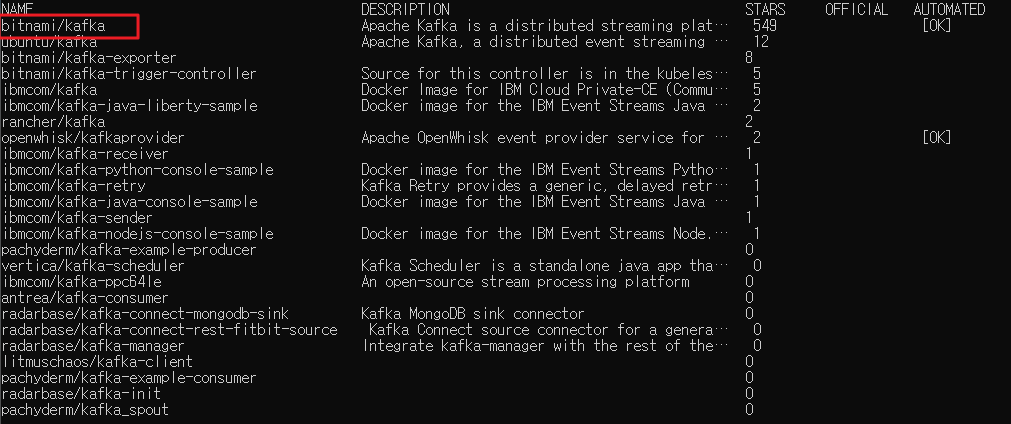
- docker image 검색
- cmd → docker search kafka
- bitani/kafka 가 가장많이 사용 되었음, zookeeper도 kafka와 같이 검색 후 docker-compose.yaml 파일을 작성한다.
3. docker-compose.yaml 파일 작성
version: '2'
services:
  zookeeper:
    image: wurstmeister/zookeeper
    container_name: zookeeper
    ports:
      - "2181:2181"
  kafka:
    image: wurstmeister/kafka:2.12-2.5.0
    container_name: kafka
    ports:
      - "9092:9092"
    environment:
      KAFKA_ADVERTISED_HOST_NAME: 127.0.0.1
      KAFKA_ZOOKEEPER_CONNECT: zookeeper:2181
    volumes:
      - /var/run/docker.sock:/var/run/docker.sock
- docker-compose.yaml 파일 실행
docker-compose up -d- 실행 내역
C:\Users\seungkim>docker-compose up -d
Pulling zookeeper (wurstmeister/zookeeper:)...
latest: Pulling from wurstmeister/zookeeper
a3ed95caeb02: Pull complete
ef38b711a50f: Pull complete
e057c74597c7: Pull complete
666c214f6385: Pull complete
c3d6a96f1ffc: Pull complete
3fe26a83e0ca: Pull complete
3d3a7dd3a3b1: Pull complete
f8cc938abe5f: Pull complete
9978b75f7a58: Pull complete
4d4dbcc8f8cc: Pull complete
8b130a9baa49: Pull complete
6b9611650a73: Pull complete
5df5aac51927: Pull complete
76eea4448d9b: Pull complete
8b66990876c6: Pull complete
f0dd38204b6f: Pull complete
Digest: sha256:7a7fd44a72104bfbd24a77844bad5fabc86485b036f988ea927d1780782a6680
Status: Downloaded newer image for wurstmeister/zookeeper:latest
Pulling kafka (wurstmeister/kafka:2.12-2.5.0)...
2.12-2.5.0: Pulling from wurstmeister/kafka
540db60ca938: Pull complete
f0698009749d: Pull complete
e3bfc15bf38f: Pull complete
b4f532554682: Pull complete
b8fb621df6a8: Pull complete
Digest: sha256:ed8058aa4ac11f2b08dd1e30bd5683f34d70ed773a0c77e51aa1de2bbcd9c2a8
Status: Downloaded newer image for wurstmeister/kafka:2.12-2.5.0
Creating kafka     ... done
Creating zookeeper ... done
- 다운로드 된 docker image 확인

- 실행중인 docker image 확인

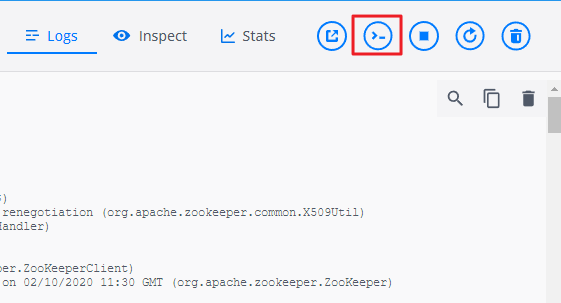
- 컨테이너에 접근하여 생산과 소비가 잘 동작 하는지 확인하기
- 컨테이너 내부로 접근하기, 해당 아이콘을 클릭하여 컨테이너 내부로 접근한다.
- 토픽 생성하기
kafka-topics.sh --create --zookeeper zookeeper:2181 --replication-factor 1 --partitions 1 -
-topic exam-topic

# 토픽이 생성됨
Created topic exam-topic.
- 생성된 토픽을 Producer를 실행한다.
/opt/kafka_2.12-2.5.0/bin # kafka-console-producer.sh --topic exam-topic --broker-list localhost:9092
>this is a msg;
>hihi
>aa
>bb
>test
>test-01
>test-02
>test-03
>test-04
>test-05
- 새로운 터미날 창을 열고 Consumer를 실행한다.
/ # kafka-console-consumer.sh --topic exam-topic --bootstrap-server localhost:9092 --from-beginning
this is a msg;
hihi
aa
bb
test
test-01
test-02
test-03
test-04
test-05
- 해당 영상은 아래와 같다.
4. build.gradle 디펜던시 추가하기
/* kafka 디펜던시 추가 */
implementation 'org.springframework.kafka:spring-kafka'
testImplementation('org.springframework.boot:spring-boot-starter-test') {
exclude group: 'org.junit.vintage', module: 'junit-vintage-engine'
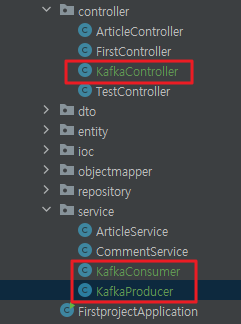
}- KafkaController.java
package com.example.firstproject.controller;

import com.example.firstproject.service.KafkaProducer;
import org.springframework.beans.factory.annotation.Autowired;
import org.springframework.web.bind.annotation.PostMapping;
import org.springframework.web.bind.annotation.RequestMapping;
import org.springframework.web.bind.annotation.RequestParam;
import org.springframework.web.bind.annotation.RestController;

@RestController
@RequestMapping(value = "/kafka")
public class KafkaController {
    private final KafkaProducer producer;

    @Autowired
    KafkaController(KafkaProducer producer) {
        this.producer = producer;
    }

    @PostMapping
    public String sendMessage(@RequestParam("message") String message) {
        this.producer.sendMessage(message);

        return "success";
    }
}
- KafkaProducer.java
package com.example.firstproject.service;

import org.springframework.beans.factory.annotation.Autowired;
import org.springframework.kafka.core.KafkaTemplate;
import org.springframework.stereotype.Service;

@Service
public class KafkaProducer {
    private static final String TOPIC = "exam";
    private final KafkaTemplate<String, String> kafkaTemplate;

    @Autowired
    public KafkaProducer(KafkaTemplate kafkaTemplate) {
        this.kafkaTemplate = kafkaTemplate;
    }

    public void sendMessage(String message) {
        System.out.println(String.format("Produce message : %s", message));
        this.kafkaTemplate.send(TOPIC, message);
    }
}
- KafkaConsumer.java
package com.example.firstproject.service;

import org.springframework.kafka.annotation.KafkaListener;
import org.springframework.stereotype.Service;

import java.io.IOException;

@Service
public class KafkaConsumer {

    @KafkaListener(topics = "exam", groupId = "zzanggu-test")
    public void consume(String message) throws IOException {
        System.out.println(String.format("Consumed message : %s", message));
    }
}
- application.properties 내용 추가하기
# Kafka 세팅
spring.kafka.bootstrap-servers=localhost:9092
spring.kafka.consumer.group-id=zzanggu-test
spring.kafka.consumer.enable-auto-commit=true
spring.kafka.consumer.auto-offset-reset=latest
spring.kafka.producer.key-serializer=org.apache.kafka.common.serialization.StringSerializer
spring.kafka.consumer.key-deserializer=org.apache.kafka.common.serialization.StringDeserializer
spring.kafka.producer.value-serializer=org.apache.kafka.common.serialization.StringSerializer
spring.kafka.consumer.value-deserializer=org.apache.kafka.common.serialization.StringDeserializer
spring.kafka.consumer.max-poll-records=1000
spring.kafka.template.default-topic=exam
5. 실행, 메세지 발행 및 구독 하기
- 스프링부트 정상연결 확인

- 메세지 발행 및 구독 하기
- 우선 카프카 컨테이너에서 exam 토픽에 메시지가 전송되었는지 확인한다.
kafka-console-consumer.sh --bootstrap-server localhost:9092 --topic exam- 아직 메세지가 발송된 적이 없으니, 아무것도 출력되지 않고 있다.

- Postman에서 API Call을 수행하여 토픽이 정상적으로 전달 되는지 확인한다.
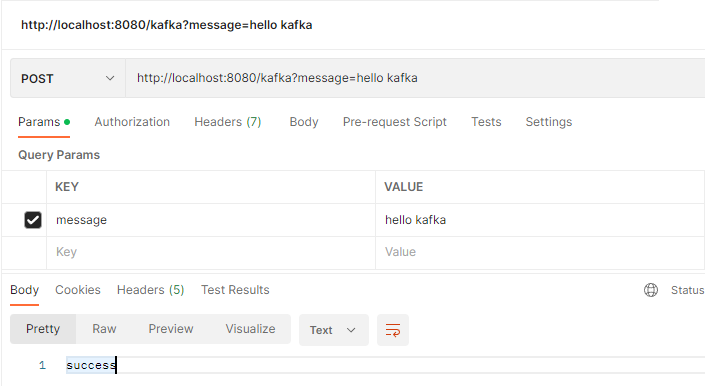
http://localhost:8080/kafka?message=hello kafkakey: message, value: hello kafka
- 실행 결과

- 실행결과 (동영상)
반응형
'Apache Kafka' 카테고리의 다른 글
| Producer에서 Topic 생성, Partition 개수 늘리기, Consumer 데이터 확인 및 기본 명령어 정리 (0) | 2023.12.15 |
|---|---|
| Kafka 설정 정리 (0) | 2023.12.14 |
| Apache Kafka 주요 개념 정리 (0) | 2023.12.14 |
| Windows에서 Apache kafka 실행하기 (0) | 2023.04.11 |
| EKS에 Kafka를 설치 후 테스트 하기 (0) | 2022.09.26 |

