# AWS Load Balancer Controller 관련 설치 정보
https://docs.aws.amazon.com/eks/latest/userguide/aws-load-balancer-controller.html
Installing the AWS Load Balancer Controller add-on - Amazon EKS
If your nodes don't have access to the Amazon EKS Amazon ECR image repositories, then you need to pull the following image and push it to a repository that your nodes have access to. For more information on how to pull, tag, and push an image to your own r
docs.aws.amazon.com
1. ALB 설정
- 자격증명 만들기
- 기본 명령어
eksctl utils associate-iam-oidc-provider \
    --region <region-code> \
    --cluster <your-cluster-name> \
    --approve
- 적용 명령어 (예시) - 만약 ALB롤이 생성이 되어있고 클러스터만 추가로 생성 했다면 아래의 명령어에서 클러스터 이름만 변경 후 적용하면 된다.
eksctl utils associate-iam-oidc-provider \
    --region ap-northeast-2 \
    --cluster EKS-CLUSTER-NAME \
    --approve
- ALB에 대한 정책 생성
curl -O https://raw.githubusercontent.com/kubernetes-sigs/aws-load-balancer-controller/v2.5.4/docs/install/iam_policy.json

curl -o iam-policy.json https://raw.githubusercontent.com/kubernetes-sigs/aws-load-balancer-controller/v2.2.1/docs/install/iam_policy.json
- 위에서 받은 json 파일을 이용하여 아래의 명령어를 실행
aws iam create-policy \
    --policy-name AWSLoadBalancerControllerIAMPolicy \
    --policy-document file://iam-policy.json
- 이미 존재하는 정책이라고 나오는 경우 아래와 같이 정책을 연결만 해주자.
아래는 예시이다.
aws iam attach-role-policy \
    --role-name <WorkerNoderole-이름> \
    --policy-arn arn:aws:iam::<계정번호>:policy/AWSLoadBalancerControllerIAMPolicy

aws iam attach-role-policy \
    --role-name eks-worker-role \
    --policy-arn arn:aws:iam::11111111111:policy/AWSLoadBalancerControllerIAMPolicy
만약 아래와 같이 에러가 발생하면, 한줄로 작성하면 된다.
To see help text, you can run:

  aws help
  aws <command> help
  aws <command> <subcommand> help

usage: aws [options] <command> <subcommand> [<subcommand> ...] [parameters]
aws: error: the following arguments are required: --role-name, --policy-arn
--role-name: command not found
--policy-arn: command not found
한줄 작성
aws iam attach-role-policy --role-name WorkerNode-Role --policy-arn arn:aws:iam::11111111111111:policy/AWSLoadBalancerControllerIAMPolicy2. 클러스터에 대한 서비스 어카운트 생성
- 기본 명령어
eksctl create iamserviceaccount \
--cluster=<cluster-name> \
--namespace=kube-system \
--name=aws-load-balancer-controller \
--attach-policy-arn=arn:aws:iam::<AWS_ACCOUNT_ID>:policy/AWSLoadBalancerControllerIAMPolicy \
--override-existing-serviceaccounts \
--approve
- 적용 명령어 (예시)
eksctl create iamserviceaccount \
--cluster=EKS-CLUSTER-NAME \
--namespace=kube-system \
--name=aws-load-balancer-controller \
--attach-policy-arn=arn:aws:iam::111111111111:policy/AWSLoadBalancerControllerIAMPolicy \
--override-existing-serviceaccounts \
--approve
- cert-manager 설치 (이전 버전 설치) ▶ (5.여기서부터 AWS 공식문서 확인하면서 작성하면 된다.)
kubectl apply --validate=false -f https://github.com/jetstack/cert-manager/releases/download/v1.0.2/cert-manager.yaml신규버전 설치
kubectl apply --validate=false -f https://github.com/jetstack/cert-manager/releases/download/v1.4.1/cert-manager.yaml더 최신버전 설치
kubectl apply -f https://github.com/jetstack/cert-manager/releases/download/v1.5.3/cert-manager.yaml- ALB controller 생성하기
wget https://raw.githubusercontent.com/kubernetes-sigs/aws-load-balancer-controller/v2.2.1/docs/install/v2_2_1_full.yaml- 위의 파일을 다운 받은 후 vi나 vim 으로 v2_2_1_full.yaml 파일을 오픈한다.
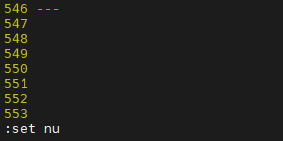
- set nu 를 아래와 같이 입력하여 각 줄의 번호를 표시 한다.

- /cluster-name 을 입력하고, 아래와 같이 변경을 한다.


# cluster-name의 부분을 반드시 생성한 클러스터의 이름으로 변경 합니다.
apiVersion: apps/v1
kind: Deployment
. . .
name: aws-load-balancer-controller
namespace: kube-system
spec:
    . . .
    template:
        spec:
            containers:
                - args:
                    - --cluster-name=<INSERT_CLUSTER_NAME> # 798번째 줄

# 우리는 이전의 서비스 어카운트를 미리 생성했으므로 파일의 끝부분으로 이동하여 kind:ServiceAccount 부분을 모두 삭제 합니다.
# 547번째 줄
apiVersion: v1
kind: ServiceAccount
- 이제 ALB 컨트롤러를 설치 한다.
kubectl apply -f v2_2_1_full.yaml* 주의 사항 : cert-manager 관련 오브젝트들이 전부 설치가 된 후 ALB 컨트롤러를 실행해야 한다.
여기까지 수행하면 k8s 클러스터에 ingress를 위한 ALB Controller가 설치 되었다.
3. nginx 서비스 배포하여 ALB 적용 확인 하기
deployment → service → ingress 순으로 실행한다. 각 단계별로 정상적으로 실행 되었는지 확인하고 진행 한다.
- deployment
파일명: nginx-deployment.yaml
파일 내용 (예시)
apiVersion: apps/v1
kind: Deployment
metadata:
  name: nginx
  namespace: nginx
  labels:
    app: nginx
spec:
  replicas: 8
  selector:
    matchLabels:
      app: nginx
  template:
    metadata:
      labels:
        app: nginx
    spec:
      containers:
      - name: nginx
        image: nginx:1.14.2
        ports:
        - containerPort: 80
- service
파일명: nginx-service.yaml
파일 내용 (예시)
apiVersion: v1
kind: Service
metadata:
  name: nginx-service
  namespace: nginx
  annotations:
    alb.ingress.kubernetes.io/healthcheck-path: "/healthy"
spec:
  selector:
     app: nginx
  type: NodePort
  ports:
  - port: 8080
    protocol: TCP
    targetPort: 80
- ingress
파일명: nginx-ingress.yaml
파일 내용 (예시)
apiVersion: networking.k8s.io/v1
kind: Ingress
metadata:
  name: nginx-ingress
  namespace: nginx
  annotations:
    kubernetes.io/ingress.class: alb
    alb.ingress.kubernetes.io/scheme: internet-facing
    alb.ingress.kubernetes.io/target-type: instance
spec:
  rules:
    - http:
        paths:
          - path: /
            pathType: Prefix
            backend:
              service:
                name: "nginx-service"
                port:
                  number: 8080
4. 생성된 서비스 확인
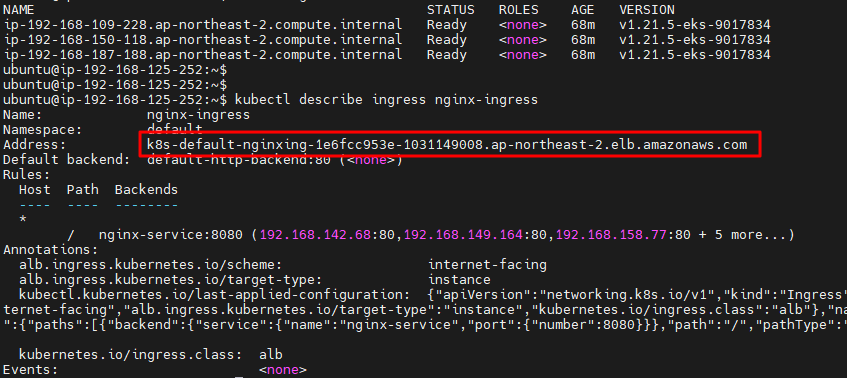
kubectl describe ingress nginx-ingress- Address에 나와있는 주소가 실제 접속하는 주소라고 보면 된다.

- Address 주소를 복사하여 웹페이지에 붙여넣으면, 아래와 같이 nginx 화면을 볼 수 있다.

5. AWS 로드밸런서가 확인
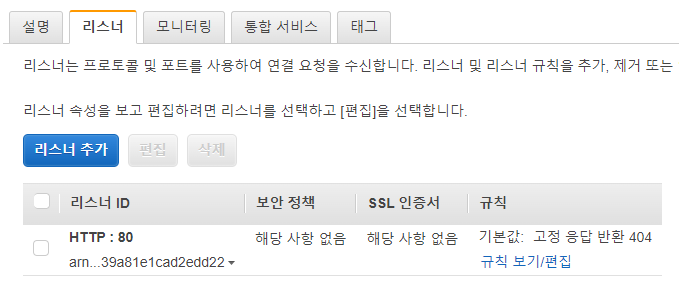
AWS에서 ALB가 자동으로 생성되었나 확인한다.

리스너는 아래와 같이 고정 응답 반환 404를 하도록 구성 되어 있다.

https://aws.amazon.com/ko/premiumsupport/knowledge-center/eks-load-balancer-webidentityerr/
Amazon EKS에서 AWS 로드 밸런서 컨트롤러를 사용할 때 “webidentityerr” 오류가 발생하는 이유는 무엇
Amazon EKS에서 AWS 로드 밸런서 컨트롤러를 사용할 때, WebIdentityErr: failed to retrieve credentials caused by: AccessDenied 오류는 다음 이유로 발생할 수 있습니다. 잘못된 서비스 계정 구성 서비스 계정에 사용
aws.amazon.com
- 이제 다양한 서비스를 eks-alb를 통해 실행 후 동작 과정을 살펴보자.
'⌛ AWS 인프라 구성하기 (MiniProject) > ✅ 개발환경 구성 (EKS)' 카테고리의 다른 글
| (미완성) CI/CD 환경 구성 (1) (0) | 2022.05.23 |
|---|---|
| 5. 생성한 이미지를 ECR로 업로드 하기 (0) | 2022.05.12 |
| 4. 수동으로 Source 빌드 후 배포하기 (0) | 2022.05.12 |
| 2.EKS 기본 아키텍처 구성하기 (EKS 인프라 구성) (0) | 2022.05.11 |
| 1.EKS 기본 아키텍처 구성하기 (WorkFlow) (0) | 2022.05.11 |


