이전에 테라폼으로 생성한 인스턴스에서 웹 서버를 실행하고 HTTP 요청에 응답을 할 수 있도록 구성한다.
여기서는 간단하게 bin/bash 쉘 스크립으를 작성하고 busybox를 통해서 간단한 응답을 구현한다.
아래와 같이 bash 쉘 스크립트를 작성 한다.
#!/bin/bash
echo "Hello, World" > index.html
nohup busybox httpd -f -p 8080 &
위의 bash 스크립트는 index.html 파일에 'HelloWorld'라는 텍스트를 거장한 다음, busybox라는 도구로 8080으로 통신하는 웹서버를 실행하도록 구성 되었다. 그리고 nohup과 &로 래핑하여 bash 스크립트가 종료 되더라고 웹 서버가 백드라운드에서 영구적으로 실행 되도록 구성 되었다.
참고로 1024보다 적은 포트번호를 사용하려면 root 권한이 필요하므로, 8080포트를 사용하여 일반 사용자도 웹서버를 실행 시키도록 구성 한다.
<<-EOF 및 EOF는 테라폼의 히어닥(heredoc) 구문을 이용해 줄바꿈 문자를 삽입하지 않고도 여러줄로 된 코드를 작성 할 수 있다.
EC2 인스턴스에서 쉘 스크립으 실행
provider "aws" {
	region = "ap-northeast-2"
}

resource "aws_instance" "example" {
	ami	= "ami-0454bb2fefc7de534"
	instance_type = "t2.micro"

user_data = <<-EOF
		#!/bin/bash
		echo "Hello, World" > index.html
		nohup busybox httpd -f -p 8080 &
		EOF

tags = {
	Name = "terraform-example"
	}
}
위 코드처럼 user_data를 설정하여 'Hello, World' 스크립트를 실행 할 수 있다. EC2 인스턴스가 실행될때 쉘 스크립트 또는 파워쉘 명령어를 통해 user_data를 전달하여 특정 작업을 수행 하도록 할 수 있다.
보안그룹 생성
기본적으로 AWS EC2 인스턴스는 보안그룹을 통해 트래픽의 IN, OUT을 설정해 주어야 한다.
위의 코드에서 8080으로 트래픽을 받을 것이므로 8080포트에대한 트래픽을 수신하도록 보안그룹을 생성 해야 한다.
아래에 보안그룹을 생성하는 테라폼 코드를 작성 한다.
아래의 코드를 설명하자면, aws_security_group이라는 새 리소스를 생성 후 CIDR 블록 0.0.0.0/0(어디에서든) 8080포트로 들어오는 TCP요청을 승인하도록 설정 하였다. CIDR 블록은 IP 주소 범위를 지정하는 간단한 방법이며, 예를들면 10.0.0.0/24의 CIDR 블록은 10.0.0.0~10.0.0.255 사이의 모든 IP 주소를 나타낸다. 여기서는 CIDR 블록을 0.0.0.0/0으로 설정 하였으므로, 이 보안그룹은 모든 IP의 8080으로 들어오는 요청을 허용한다고 볼 수 있다.
egress는 outbound 트래픽을 정의하는 것으로, 외부로 나가는 트래픽 경로를 설정 한다고 볼 수 있다. 보통 외부로 나가는 트래픽의 경우 ALL로 설정해 두는게 Default 이다.
resource "aws_security_group" "instance" {
  name = "terraform-example-instance"

  ingress {
	  from_port = 8080
	  to_port = 8080
	  protocol = "tcp"
	  cidr_blocks = ["0.0.0.0/0"]
  }
    egress {
    from_port        = 0
    to_port          = 0
    protocol         = "-1"
    cidr_blocks      = ["0.0.0.0/0"]
    ipv6_cidr_blocks = ["::/0"]
  }
}
위의 코드를 terraform main.tf 파일에 추가 후 terraform plan을 수행한다.
main.tf 파일의 전체 코드
여기서 인스턴스 리소스가 생성한 security 그룹을 참조하여야 하기 때문에 여기서는 테라폼의 리소스 참조값의 사용법을 익혀야 한다. 기본적인 terraform의 리소스 참조 값: <PROVIDER>_<TYPE>.<NAME>.<ATTRIBUTE>
PROVIDER: AWS와 같은 공급자 이름
TYPE: security_group 와 같은 리소스 유형
NAME: instance와 같은 리소스의 이름
ATTRIBUTE: 'name'과 같은 리소스의 인수중 하나 이거나, 리소스가 내보낸 속성 중 하나 여기서 보안그룹은 id라는 속성을 내보내므로 이를 참조하는 표현식은 다음과 같다. aws_security_group.instance.id
provider "aws" {
	region = "ap-northeast-2"
}

resource "aws_security_group" "instance" {
  name = "terraform-example-instance"

  ingress {
	  from_port = 8080
	  to_port = 8080
	  protocol = "tcp"
	  cidr_blocks = ["0.0.0.0/0"]
  }

    egress {
    from_port        = 0
    to_port          = 0
    protocol         = "-1"
    cidr_blocks      = ["0.0.0.0/0"]
    ipv6_cidr_blocks = ["::/0"]
  }
}

resource "aws_instance" "example" {
	ami	= "ami-0ed11f3863410c386"
	instance_type = "t2.micro"
	vpc_security_group_ids = [aws_security_group.instance.id]

user_data = <<-EOF
		#!/bin/bash
		echo "Hello, World" > index.html
		nohup busybox httpd -f -p 8080 &
		EOF

tags = {
	Name = "terraform-example"
	}
}
terraform의 구성 시 종속성 그래프 확인
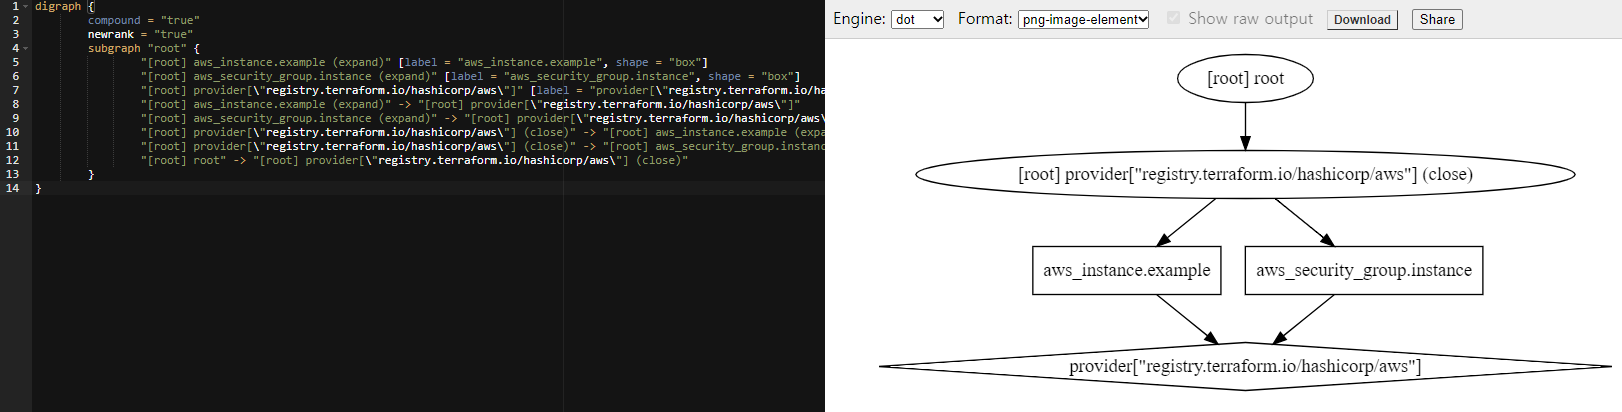
terraform graph 를 입력하면 아래와 같이 terraform이 리소스를 생성 시 리소스를 생성하는 순서를 표시 합니다.
예를들어 EC2 인스턴스가 보안 그룹의 ID를 참조하므로 코드를 처음 배포하는 경우 테라폼은 EC2 인스턴스를 생성하기 전에 먼저 보안그룹을 만들어야 한다고 판단 합니다.
C:\Users\hist\terraform>terraform graph
digraph {
        compound = "true"
        newrank = "true"
        subgraph "root" {
                "[root] aws_instance.example (expand)" [label = "aws_instance.example", shape = "box"]
                "[root] aws_security_group.instance (expand)" [label = "aws_security_group.instance", shape = "box"]
                "[root] provider[\"registry.terraform.io/hashicorp/aws\"]" [label = "provider[\"registry.terraform.io/hashicorp/aws\"]", shape = "diamond"]
                "[root] aws_instance.example (expand)" -> "[root] provider[\"registry.terraform.io/hashicorp/aws\"]"
                "[root] aws_security_group.instance (expand)" -> "[root] provider[\"registry.terraform.io/hashicorp/aws\"]"
                "[root] provider[\"registry.terraform.io/hashicorp/aws\"] (close)" -> "[root] aws_instance.example (expand)"
                "[root] provider[\"registry.terraform.io/hashicorp/aws\"] (close)" -> "[root] aws_security_group.instance (expand)"
                "[root] root" -> "[root] provider[\"registry.terraform.io/hashicorp/aws\"] (close)"
        }
}
위의 코드를 아래의 사이트에 복사하여 붙여 넣으면 그래프 구조로 확인을 할 수 있다.
Graphviz Online
dreampuf.github.io
이제 terraform plan을 입력하여 변경사항을 확인하다.
아래 코드에서 -/+는 대체(replace)를 의미 한다. 해당 인스턴스를 apply하여 최종 배포 시 기존의 인스턴스는 종료가 되고 새로운 인스턴스가 생성되는것을 확인할 수 있다. 이후의 인스턴스를 종료하지 않고 무중단으로 배포하는 방법도 작성 예정이다.
aws_instance.example: Refreshing state... [id=i-02ed6a76f1c24edf1]

Terraform used the selected providers to generate the following execution plan. Resource actions are indicated with the following symbols:
  + create
  ~ update in-place

Terraform will perform the following actions:

  # aws_instance.example will be updated in-place
  ~ resource "aws_instance" "example" {
        id                                   = "i-0000000000001"
        tags                                 = {
            "Name" = "terraform-example"
        }
      + user_data                            = "67eeeeeeeeeeeeeeeeeee9c"
      ~ vpc_security_group_ids               = [
          + "aws_security_group.instance.id",
          - "sg-c9999999",
        ]
        # (28 unchanged attributes hidden)


        # (5 unchanged blocks hidden)
    }

  # aws_security_group.instance will be created
  + resource "aws_security_group" "instance" {
      + arn                    = (known after apply)
      + description            = "Managed by Terraform"
      + egress                 = (known after apply)
      + id                     = (known after apply)
      + ingress                = [
          + {
              + cidr_blocks      = [
                  + "0.0.0.0/0",
                ]
              + description      = ""
              + from_port        = 8080
              + ipv6_cidr_blocks = []
              + prefix_list_ids  = []
              + protocol         = "tcp"
              + security_groups  = []
              + self             = false
              + to_port          = 8080
            },
        ]
      + name                   = "terraform-example-instance"
      + name_prefix            = (known after apply)
      + owner_id               = (known after apply)
      + revoke_rules_on_delete = false
      + tags_all               = (known after apply)
      + vpc_id                 = (known after apply)
    }

Plan: 1 to add, 1 to change, 0 to destroy.
terraform apply를 입력하여 최종적으로 리소스를 반영한다.
정상적으로 반영된 것을 확인할 수 있다.
Terraform will perform the following actions:
# aws_instance.example will be updated in-place
~ resource "aws_instance" "example" {
id = "i-09999999999999f1"
tags = {
"Name" = "terraform-example"
}
~ vpc_security_group_ids = [
+ "sg-00c6a7f6821e544df",
- "sg-c77809bb",
]
# (29 unchanged attributes hidden)
# (5 unchanged blocks hidden)
}
Plan: 0 to add, 1 to change, 0 to destroy.
Do you want to perform these actions?
Terraform will perform the actions described above.
Only 'yes' will be accepted to approve.
Enter a value: yes
aws_instance.example: Modifying... [id=i-02ed6a76f1c24edf1]
aws_instance.example: Modifications complete after 1s [id=i-02ed6a76f1c24edf1]
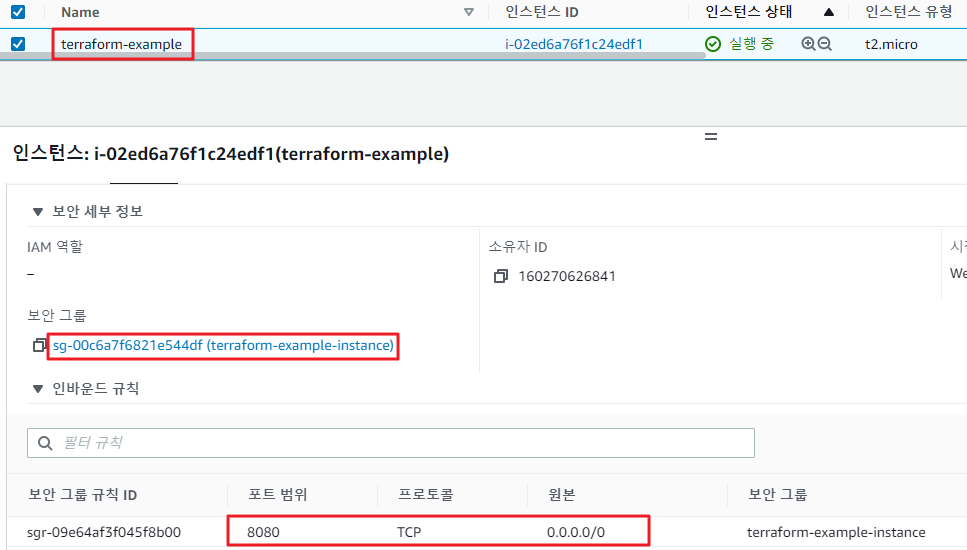
Apply complete! Resources: 0 added, 1 changed, 0 destroyed.AWS 콘솔로 이동하여 기존의 인스턴스가 생성된 보안그룹으로 연결이 되었는지 확인한다.
아래의 결과에서 확인 가능하듯이 이전에 생성한 terraform-example-instance 라는 이름으로 보안그룹이 생성 되었고, 해당 보안그룹이 inbound로 받는 port 번호는 8080 그리고 ip대역대는 ALL로 받게끔 설정 되어있는것을 확인 할 수 있다.
그리고 위에 egress로 생성하였던 outbound도 확인해보면 ALL로 트래픽을 내보내는것을 확인 할 수 있다.
참고 : user_data는 인스턴스가 실행될 때 처음 한번만 실행할 수 있다. user_data가 변경되면 테라폼은 기존의 인스턴스를 삭제하고 새로운 인스턴스를 구동하도록 동작 한다.
HTTP 요청 수행
웹 브라우저 및 curl과 같은 도구를 사용하여 8080 포트에서 신규로 생성한 인스턴스의 퍼블릭 IP로 HTTP 요청을 수행 하여 정상적으로 데이터를 반환하는지 확인 한다.
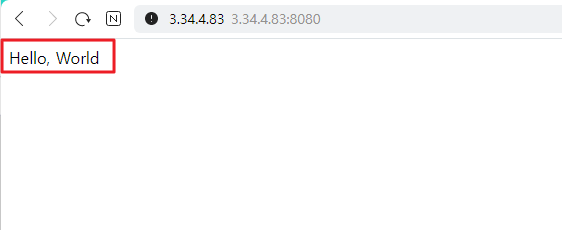
정상적으로 Hello, World가 반환된것을 확인 할 수 있다.
'♻ Terraform(테라폼) > Terraform 활용' 카테고리의 다른 글
| 테라폼을 활용한 S3 버킷 저장소 생성 (lock) (0) | 2022.04.14 |
|---|---|
| 테라폼을 활용한 웹서버 클러스터(ASG) 배포 (0) | 2022.04.13 |
| 테라폼을 활용한 단일서버 배포 (0) | 2022.04.13 |
| Terraform 을 활용하여 IAM 설정하기 (0) | 2021.08.31 |
| Terraform 으로 S3 Bucket 생성하고 파일 업로드 및 다운로드 하기 (0) | 2021.08.31 |


