반응형
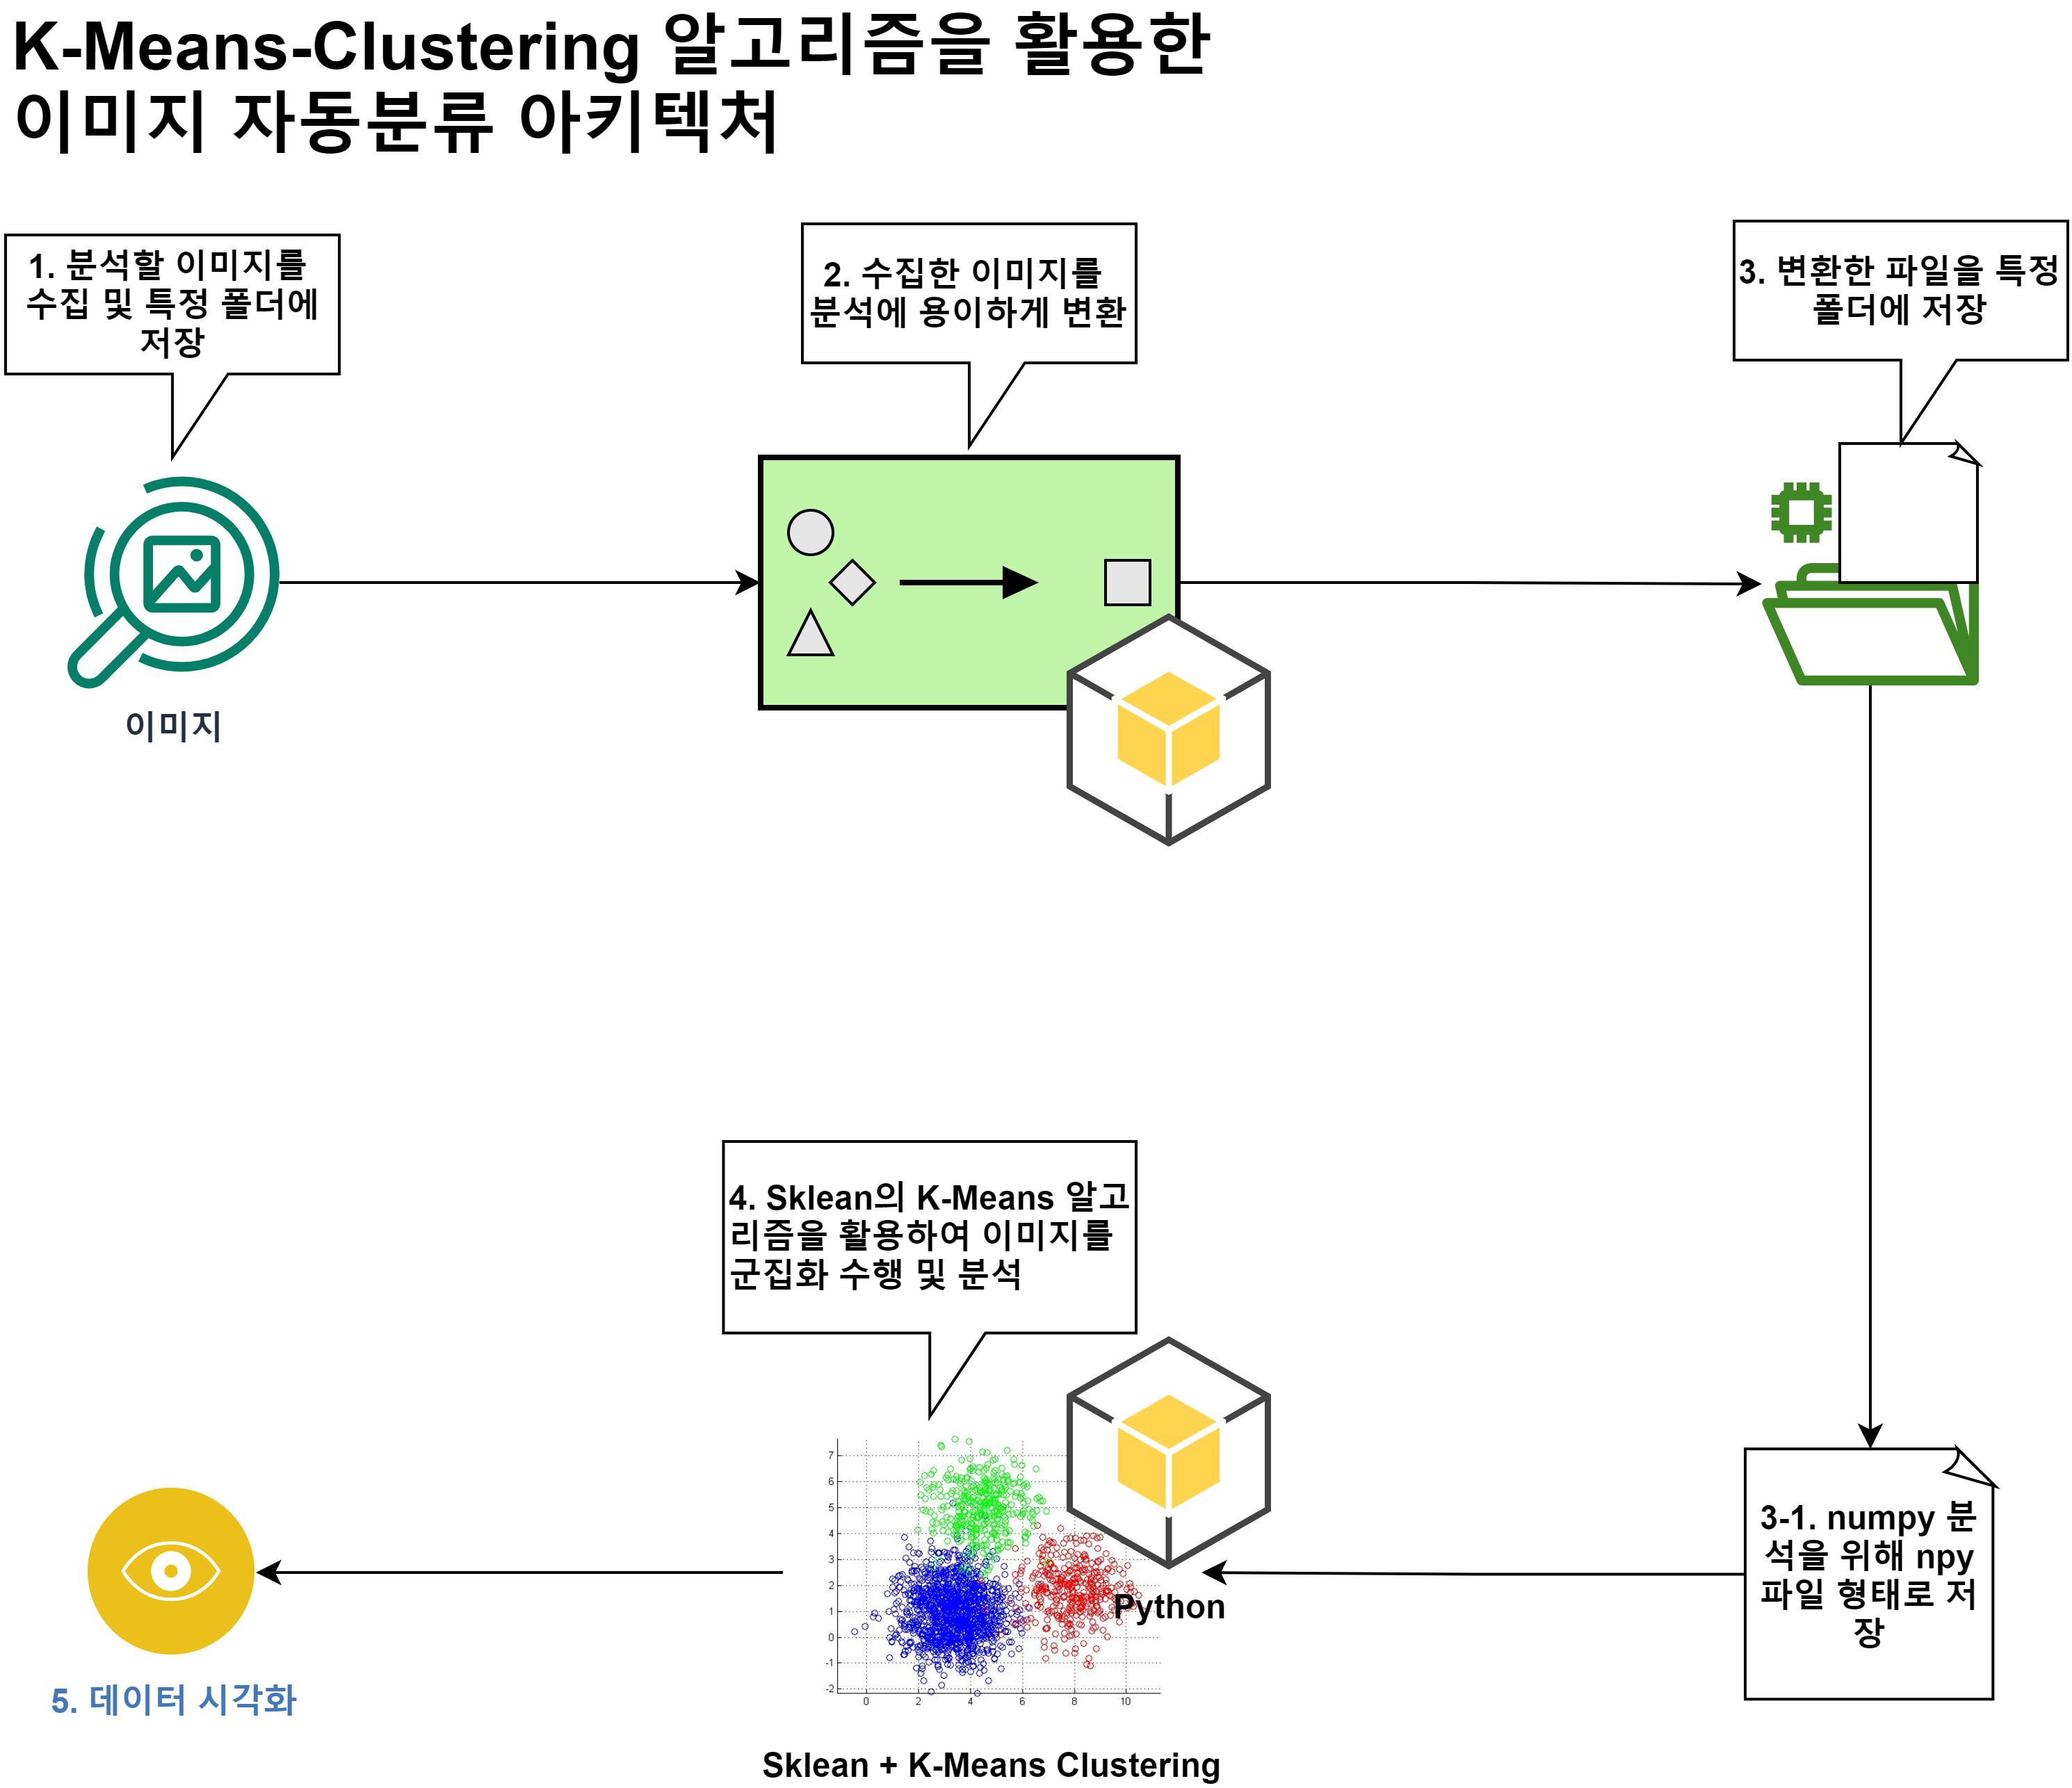
# 구성 아키텍처
목적: 수백개의 이미지들 중에서 K-Means-Clustering을 활용하여 비슷한? 이미지들 끼리 자동으로 분류 하는것
# 2~3.1 까지의 이미지 변환 및 npy파일로 변환 코드
# 라이브러리 호출
import os
import numpy as np
from PIL import Image

# 이미지 리 사이징 하기
targerdir = r"./sample_data"  # 해당 폴더 설정

files = os.listdir(targerdir)

format = [".jpg", ".png", ".jpeg", "bmp", ".JPG", ".PNG", "JPEG", "BMP"]  # 지원하는 파일 형태의 확장자들
for (path, dirs, files) in os.walk(targerdir):
    for file in files:
        if file.endswith(tuple(format)):
            image = Image.open(path + "\\" + file)
            print(image.filename)
            print(image.size)

            if image.mode != 'RGB':
                image = image.convert('RGB')
                print("RGB 모드가 아닌 이미지를 변환!")

            image = image.resize((100,100))
            image.save("./sample_data/100/" + file)
            # image.save(file)

            print(image.size)

        else:
            print(path)
            print("InValid", file)

# 변환할 이미지 목록 불러오기
image_path = './sample_data/100/'

img_list = os.listdir(image_path)  # 디렉토리 내 모든 파일 불러오기
img_list_jpg = [img for img in img_list if img.endswith(".jpg")]  # 지정된 확장자만 필터링

print("img_list_jpg: {}".format(img_list_jpg))

img_list_np = []

for i in img_list_jpg:
    img = Image.open(image_path + i)
    img_array = np.array(img)
    img_list_np.append(img_array)
    print(i, " 추가 완료 - 구조:", img_array.shape)  # 불러온 이미지의 차원 확인 (세로X가로X색)
    print(img_array.T.shape) #축변경 (색X가로X세로)

img_np = np.array(img_list_np)  # 리스트를 numpy로 변환
np.save('./sample_data', img_np)  # x_save.npy
print(img_np.shape)
print("결과: 정상적 으로 저장 완료")
- 이 코드를 수행하면 sample_data 폴더안에 100 이라는 폴더가 생성되고, 루트 경로에 sample_data.npy파일이 생성된다. 여기서 sample_data.npy파일은 변환된 이미지를 모두 가지고 있는 numpy 라이브러리에서 사용가능한 파일의 형태라고 볼 수 있다.
# 4~5번의 Sk-lean과 K-Means Clustering 알고리즘을 활용한 데이터 군집화 코드
import numpy as np

sample_data = np.load('sample_data.npy')
# fruits = np.load('fruits_300.npy')
# If M is (32 x 32 x 3), then .reshape(1,-1) will produce a 2d array (not 1d), of shape (1, 32*32*3).
# That can be reshaped back to (32,32,3) with the same sort of reshape statement.
sample_data_2d = sample_data.reshape(-1, 100 * 100 * 3)

print("sample_data의 shape 맞추기:", sample_data)
print("sample_data_2d의 shape 맞추기:", sample_data_2d)
# 여기에서 출력되는 차원의 숫자가 같아야 한다.
print("sample_data.shape:", sample_data.shape)
print("sample_data_2d.shape:", sample_data_2d.shape)

from sklearn.cluster import KMeans

# K값을 지정해 준다.random_state=항상 값은값이 랜덤하게 나온다.
km = KMeans(n_clusters=5)  # random_state=42 -> 항상 랜덤값이 같게 하기위해 쓴다.
# 사이킷 런의 철학은 nxd, 갯수x차원
km.fit(sample_data_2d)
# 할당된 레이블의 결과를 볼 수 있다.
print("km.labels_", km.labels_)
print("km.labels_.shape", km.labels_.shape)
print("첫번째:", km.labels_[0:])
# print("두번째:", km.labels_[10:20])
# print("세번째:", km.labels_[20:30])

print(np.unique(km.labels_, return_counts=True))
print(km.labels_)

import matplotlib.pyplot as plt


def draw_sample_data(arr, ratio=1):
    n = len(arr)  # n은 샘플 개수입니다
    # 한 줄에 10개씩 이미지를 그립니다. 샘플 개수를 10으로 나누어 전체 행 개수를 계산합니다.
    print(n)
    rows = int(np.ceil(n / 10))
    # 행이 1개 이면 열 개수는 샘플 개수입니다. 그렇지 않으면 10개입니다.
    cols = n if rows < 2 else 10
    fig, axs = plt.subplots(rows, cols,
                            figsize=(cols * ratio, rows * ratio), squeeze=False)
    for i in range(rows):
        print(i)
        for j in range(cols):
            if i * 10 + j < n:  # n 개까지만 그립니다.
                print(i)
                axs[i, j].imshow(arr[i * 10 + j], cmap='gray_r')
            axs[i, j].axis('off')
    plt.show()


draw_sample_data(sample_data[km.labels_ == 0])
draw_sample_data(sample_data[km.labels_ == 1])
draw_sample_data(sample_data[km.labels_ == 2])
draw_sample_data(sample_data[km.labels_ == 3])
draw_sample_data(sample_data[km.labels_ == 4])
# 해당 코드를 구현한 결과
- 이미지를 군집하여 결과를 출력한 결과
- 이론이 너무 복잡하여 코드 위주로... 작성... 이론은 따로 나중에 기회가 있다면? 정리해서 올리도록... 노력? 이 필요!
- 끝 -
반응형