# 리소스 태깅 정보를 활용하여 Terraformer를 수행, 해당 리소스를 가져오는 작업을 해보자.
태깅정보는 리소스를 관리하는 요소중에 가장 기본적인 요소라고 할 수 있다.
finops에서도 태깅 정보를 기반한 리소스 조회 및 리소스 관리 등 여러가지 작업을 할 수 있었는데, terraformer를 활용하여 리소스를 관리하는 과정에서도 해당 리소스에 태깅 정보는 매우 중요하다.
https://github.com/GoogleCloudPlatform/terraformer
GitHub - GoogleCloudPlatform/terraformer: CLI tool to generate terraform files from existing infrastructure (reverse Terraform).
CLI tool to generate terraform files from existing infrastructure (reverse Terraform). Infrastructure to Code - GitHub - GoogleCloudPlatform/terraformer: CLI tool to generate terraform files from e...
github.com
1. 리소스를 생성하고 태깅 하기
일단은 vpc를 생성하자. 빠르게 Terraform으로 만든다. tags는 모든 VPC 생성 태그를 terraformer-test-01 으로 로 통일하자.
코드 내용은 아래와 같다. 예제 코드이므로 vpc.tf 파일에 모든 리소스를 생성 하였다.
vpc.tf
#------------------------------------VPC 생성
resource "aws_vpc" "main" {
  cidr_block = "172.16.0.0/24"

  tags = {
    Name = "terraformer-test-01"
  }
}

#------------------------------------Subnet 생성

resource "aws_subnet" "public_subnet" {
  vpc_id     = aws_vpc.main.id
  cidr_block = "172.16.0.0/27"

  availability_zone = "ap-northeast-2a"

  tags = {
    Name = "terraformer-test-01"
  }
}

resource "aws_subnet" "private_subnet" {
  vpc_id     = aws_vpc.main.id
  cidr_block = "172.16.0.32/27"

  tags = {
    Name = "terraformer-test-01"
  }
}

#------------------------------------인터넷 GW 생성

resource "aws_internet_gateway" "igw" {
  vpc_id = aws_vpc.main.id

  tags = {
    Name = "terraformer-test-01"
  }
}

#------------------------------------라우팅 테이블 생성

resource "aws_route_table" "public" {
  vpc_id = aws_vpc.main.id

  route {
    cidr_block = "0.0.0.0/0"
    gateway_id = aws_internet_gateway.igw.id
  }

  tags = {
    Name = "terraformer-test-01"
  }
}
resource "aws_route_table_association" "route_table_association_public" {
  subnet_id      = aws_subnet.public_subnet.id
  route_table_id = aws_route_table.public.id
}

resource "aws_route_table" "private" {
  vpc_id = aws_vpc.main.id

  route {
    cidr_block = "0.0.0.0/0"
    gateway_id = aws_internet_gateway.igw.id
  }

  tags = {
    Name = "terraformer-test-01"
  }
}
resource "aws_route_table_association" "route_table_association_private" {
  subnet_id      = aws_subnet.private_subnet.id
  route_table_id = aws_route_table.private.id
}
2. 생성한 vpc 리소스 적용하기
terraform init
terraform plan
terraform validate
terraform apply
명령어를 통해 위에서 작성한 vpc 리소스를 생성한다.
- 정상 생성 확인

3. terraformer의 filter 기능을 활용하여 위에서 생성한 vpc 리소스를 generate 해보는 작업을 진행한다.
- 일단 위에서 생성한 자원에 태그명을 모두 동일하게 적용 하였으므로, 아래의 명령어로 조회하면 된다.
terraformer import aws \
--resources=internet_gateway,route_table,subnet,vpc \
--regions=ap-northeast-2 \
--filter="Name=tags.Name;Value=terraformer-test-01"
- 조회결과
2023/03/22 01:33:03 Filtered number of resources for service subnet: 2
2023/03/22 01:33:03 Filtered number of resources for service route_table: 2
2023/03/22 01:33:03 Filtered number of resources for service vpc: 1
2023/03/22 01:33:03 aws Connecting....
2023/03/22 01:33:03 aws save route_table
2023/03/22 01:33:03 aws save tfstate for route_table
2023/03/22 01:33:03 aws save vpc
2023/03/22 01:33:03 aws save tfstate for vpc
2023/03/22 01:33:03 aws save subnet
2023/03/22 01:33:03 aws save tfstate for subnet
조회 결과를 보면 놀랍게도 정확하게 라우트테이블 2개, 서브넷 2개, vpc1개 읭 인터넷 게이트웨이는 어디있지?
로그를 보내 아래와 같이 인터넷 게이트웨이는 서비스하지 않는단다... 뭐지?
aws error importing internet_gateway, err: aws: internet_gateway not supported service
구글링 해보니까 internet_gateway가 아니라 terraformer 에서는 igw 라고 입력을 해야 한단다...
수정 후 다시 실행
terraformer import aws \
--resources=igw,route_table,subnet,vpc \
--regions=ap-northeast-2 \
--filter="Name=tags.Name;Value=terraformer-test-01"
결과, 정상적으로 가져옴...(헷갈려서 쓰것나 이거)
2023/03/22 01:53:16 Filtered number of resources for service subnet: 2
2023/03/22 01:53:16 Filtered number of resources for service vpc: 1
2023/03/22 01:53:16 Filtered number of resources for service igw: 1
2023/03/22 01:53:16 Filtered number of resources for service route_table: 2
2023/03/22 01:53:16 aws Connecting....
2023/03/22 01:53:16 aws save subnet
2023/03/22 01:53:16 aws save tfstate for subnet
2023/03/22 01:53:16 aws save vpc
2023/03/22 01:53:16 aws save tfstate for vpc
2023/03/22 01:53:16 aws save igw
2023/03/22 01:53:16 aws save tfstate for igw
2023/03/22 01:53:16 aws save route_table
2023/03/22 01:53:16 aws save tfstate for route_table
4. generated 된 파일을 일일이 확인해보기
- 생성 리소스 리스트는 아래와 같음, 폴더별로 리소스가 별도로 생성되어 있음.
주요 리소스만 들여다 보자. (outputs.tf, provider.tf, .tfstate 파일은 제외)

- vpc.tf
resource "aws_vpc" "tfer--vpc-00000000000000000" {
  assign_generated_ipv6_cidr_block = "false"
  cidr_block                       = "172.16.0.0/24"
  enable_dns_hostnames             = "false"
  enable_dns_support               = "true"
  instance_tenancy                 = "default"

  tags = {
    Name = "terraformer-test-01"
  }

  tags_all = {
    Name = "terraformer-test-01"
  }
}
- subnet.tf (data.으로 variable.tf에 설정되어 있는 내용은 생략... 하려고 했는데 아래에 첨부함)
resource "aws_subnet" "tfer--subnet-00000000000000000" {
  assign_ipv6_address_on_creation = "false"
  cidr_block                      = "172.16.0.0/27"
  map_customer_owned_ip_on_launch = "false"
  map_public_ip_on_launch         = "false"

  tags = {
    Name = "terraformer-test-01"
  }

  tags_all = {
    Name = "terraformer-test-01"
  }

  vpc_id = "${data.terraform_remote_state.vpc.outputs.aws_vpc_tfer--vpc-00000000000000000_id}"
}

resource "aws_subnet" "tfer--subnet-00000000000000000" {
  assign_ipv6_address_on_creation = "false"
  cidr_block                      = "172.16.0.32/27"
  map_customer_owned_ip_on_launch = "false"
  map_public_ip_on_launch         = "false"

  tags = {
    Name = "terraformer-test-01"
  }

  tags_all = {
    Name = "terraformer-test-01"
  }

  vpc_id = "${data.terraform_remote_state.vpc.outputs.aws_vpc_tfer--vpc-00000000000000000_id}"
}
- variables.tf (subnet.tf)
data "terraform_remote_state" "vpc" {
  backend = "local"

  config = {
    path = "../../../generated/aws/vpc/terraform.tfstate"
  }
}
- route_table.tf
resource "aws_route_table" "tfer--rtb-00000000000000000" {
  route {
    cidr_block = "0.0.0.0/0"
    gateway_id = "igw-00000000000000000"
  }

  tags = {
    Name = "terraformer-test-01"
  }

  vpc_id = "${data.terraform_remote_state.vpc.outputs.aws_vpc_tfer--vpc-00000000000000000_id}"
}

resource "aws_route_table" "tfer--rtb-00000000000000000" {
  route {
    cidr_block = "0.0.0.0/0"
    gateway_id = "igw-00000000000000000"
  }

  tags = {
    Name = "terraformer-test-01"
  }

  vpc_id = "${data.terraform_remote_state.vpc.outputs.aws_vpc_tfer--vpc-00000000000000000_id}"
}
- variables.tf (route_table.tf)
data "terraform_remote_state" "route_table" {
  backend = "local"

  config = {
    path = "../../../generated/aws/route_table/terraform.tfstate"
  }
}

data "terraform_remote_state" "subnet" {
  backend = "local"

  config = {
    path = "../../../generated/aws/subnet/terraform.tfstate"
  }
}

data "terraform_remote_state" "vpc" {
  backend = "local"

  config = {
    path = "../../../generated/aws/vpc/terraform.tfstate"
  }
}
- igw.tf 마지막...
resource "aws_internet_gateway" "tfer--igw-00000000000000000" {
  tags = {
    Name = "terraformer-test-01"
  }

  vpc_id = "${data.terraform_remote_state.vpc.outputs.aws_vpc_tfer--vpc-00000000000000000_id}"
}
- variables.tf (igw.tf)
data "terraform_remote_state" "vpc" {
  backend = "local"

  config = {
    path = "../../../generated/aws/vpc/terraform.tfstate"
  }
}
5. 중간 트러블슈팅 진행 (버전문제)
일단 vpc 폴더로 이동하여 terraform init을 하니까 아래와 같은 에러가 발생...

$ terraform init

Initializing the backend...
╷
│ Error: Invalid legacy provider address
│
│ This configuration or its associated state refers to the unqualified provider "aws".
│
│ You must complete the Terraform 0.13 upgrade process before upgrading to later versions.
버전이 옜날 버전이라서 안된다는거 같은데... terraform --version을 해봐도 최신버전이 설치 되어 있었다... 뭐지?
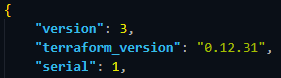
확인해보니 terraform.tfstate 파일에 버전이 3버전... 그리고 0.12.31 버전... 옜날버전이 세팅 되어 있었다.
문제해결
명령어 : terraform state replace-provider -auto-approve "registry.terraform.io/-/aws" "hashicorp/aws"
$ terraform state replace-provider -auto-approve "registry.terraform.io/-/aws" "hashicorp/aws"
Terraform will perform the following actions:

  ~ Updating provider:
    - registry.terraform.io/-/aws
    + registry.terraform.io/hashicorp/aws

Changing 1 resources:

  aws_vpc.tfer--vpc-0000000000000000

Successfully replaced provider for 1 resources.
terraform init 수행
- 정상 수행됨
$ terraform init

Initializing the backend...

Initializing provider plugins...
- Finding hashicorp/aws versions matching "~> 3.37.0"...
- Installing hashicorp/aws v3.37.0...
- Installed hashicorp/aws v3.37.0 (signed by HashiCorp)

Terraform has created a lock file .terraform.lock.hcl to record the provider
selections it made above. Include this file in your version control repository
so that Terraform can guarantee to make the same selections by default when
you run "terraform init" in the future.

Terraform has been successfully initialized!
6. generated 된 파일들의 내용을 수정 후 terraform init, plan, apply를 해보자.
- 일단 서버에 생성된 generated된 파일들을 로컬 vs code로 옮긴 후 작업을 진행한다.
vpc.tf 파일에는 현재는 변경할 내용이 없으므로 public subnet을 추가 후 route table에 추가하는 작업까지 진행해보자.
그리고 terraform apply를 통해 실제 aws 리소스에 반영을 해보자.
- 추가한 코드 내용은 아래와 같다. 기존에 subner.tf 파일에 아래의 내용만 추가해 주었다.
# -------------------------- 새로 추가한 서브넷 리소스 정보

resource "aws_subnet" "public-subnet-01" {
  assign_ipv6_address_on_creation = "false"
  cidr_block                      = "172.16.0.64/27"
  # map_customer_owned_ip_on_launch = "false"
  # map_public_ip_on_launch         = "false"

  tags = {
    Name = "terraformer-test-01"
  }

  tags_all = {
    Name = "terraformer-test-01"
  }

  vpc_id = "${data.terraform_remote_state.vpc.outputs.aws_vpc_tfer--vpc-00000000000000000_id}"
}
- 적용 : terraform validate, terraform plan, terraform apply 를 실행 후 subnet 리소스를 콘솔에서 확인하면 아래와 같다.

위와 같이 terraformer로 generate한 리소스를 기반으로 서브넷을 추가하고, 확인까지 하였다.
다음에는 console에서 ec2 인스턴스와 subnet을 생성 후 terraformer로 generate하여 적용하는 방법에 대해서 알아본다.
'♻ Terraform(테라폼) > 👉 Terraformer' 카테고리의 다른 글
| Terraformer를 통해 EKS 리소스 가져오기 (클러스터, 노드그룹) (0) | 2023.03.24 |
|---|---|
| Terraformer 트러블 슈팅 Error: Failed to read state file (0) | 2023.03.23 |
| tag 정보 기반 terraformer 리소스 필터링 하기 (0) | 2023.03.22 |
| Console에서 새로운 Subnet과 EC2 인스턴스를 추가 후 Terraformer를 통해 import 수행 (0) | 2023.03.22 |
| Terraformer 허용 리소스 확인 및 AWS 리소스 매칭 정보 (0) | 2023.03.22 |


