# nginx pod를 eks에서 pod로 배포하는 작업을 진행한다.
- eks에서는 오리지날 pod로 배포할 수도있고 fargate를 활용하여 pod로 배포가 가능하다.
- fargate란?
AWS 공식사이트 설명
AWS Fargate는 기본 인프라를 관리할 필요 없이 컨테이너를 배포하고 관리할 수 있는 컴퓨팅 엔진입니다.
Fargate를 사용하면 애플리케이션을 쉽게 확장할 수 있습니다.
더 이상 컨테이너 애플리케이션에 대해 충분한 컴퓨팅 리소스를 프로비저닝하기 위해 걱정할 필요가 없습니다.
수십 또는 수천 개의 컨테이너를 몇 초 이내에 시작할 수 있습니다.
- AWS 공식 사이트
AWS Fargate 소개
AWS Fargate는 기본 인프라를 관리할 필요 없이 컨테이너를 배포하고 관리할 수 있는 컴퓨팅 엔진입니다. Fargate를 사용하면 애플리케이션을 쉽게 확장할 수 있습니다. 더 이상 컨테이너 애플리케이
aws.amazon.com
1. AWS Fargate로 pod 배포하기
- 클러스터에 Fargate로 pod를 배포하기 위해서는 pod가 실행될 때 사용하는 하나 이상의 fargate profile을 정의해야 한다.
즉, fargate profile이란 fargate로 pod를 생성하기 위한 조건을 명시해놓은 프로파일이라고 볼 수 있다.
- 폴더 생성
mkdir /home/ubuntu/environment/manifests- 실행 파일 생성 : eks-demo-fargate-profile.yaml
- 위의 yaml 파일에서 selectors에 기재된 조건에 부합하는 pod의 경우, fargate로 배포됩니다.
cat <<EOF> eks-demo-fargate-profile.yaml
---
apiVersion: eksctl.io/v1alpha5
kind: ClusterConfig
metadata:
  name: {Cluster_Name}
  region: {AWS_REGION_Name}
fargateProfiles:
  - name: frontend-fargate-profile
    selectors:
      - namespace: {namespace_name}
        labels:
          app: {app_name}
EOF
- eks-demo-fargate-profile.yaml 예시
apiVersion: eksctl.io/v1alpha5
kind: ClusterConfig
metadata:
  name: Cluster-DEV
  region: ap-northeast-2
fargateProfiles:
  - name: frontend-fargate-profile
    selectors:
      - namespace: nginx
        labels:
          app: nginx
- fargate profile 프로비저닝 하기
eksctl create fargateprofile -f eks-demo-fargate-profile.yaml- 수행 내역
$ eksctl create fargateprofile -f eks-demo-fargate-profile.yaml
2023-03-13 07:16:24 [ℹ]  deploying stack "eksctl-Cluster-DEV-fargate"
2023-03-13 07:16:24 [ℹ]  waiting for CloudFormation stack "eksctl-Cluster-DEV-fargate"
2023-03-13 07:16:54 [ℹ]  waiting for CloudFormation stack "eksctl-Cluster-DEV-fargate"
2023-03-13 07:17:49 [ℹ]  waiting for CloudFormation stack "eksctl-Cluster-DEV-fargate"
2023-03-13 07:17:49 [ℹ]  creating Fargate profile "frontend-fargate-profile" on EKS cluster "Cluster-DEV"
2023-03-13 07:22:07 [ℹ]  created Fargate profile "frontend-fargate-profile" on EKS cluster "Cluster-DEV"
2. Fargate profile이 정상적으로 생성되었는지 확인
eksctl get fargateprofile --cluster {Cluster_Name} -o json

eksctl get fargateprofile --cluster Cluster-DEV -o json
- 정상적으로 생성 되었는지 확인, 아래와 같은 포맷으로 생성된다.
$ eksctl get fargateprofile --cluster Cluster-DEV -o json
[
    {
        "name": "frontend-fargate-profile",
        "podExecutionRoleARN": "arn:aws:iam::000000000000:role/eksctl-Cluster-DEV-FargatePodExecutionRole-00000000CAWF",
        "selectors": [
            {
                "namespace": "nginx",
                "labels": {
                    "app": "nginx"
                }
            }
        ],
        "subnets": [
            "subnet-00000000000000000",
            "subnet-00000000000000000"
        ],
        "status": "ACTIVE"
    }
]
3. deployment.yaml 파일과 service.yaml 파일을 작성 및 실행 한다.
- spec 항목의 라벨 항목을 수정한다. 그리고 spec 항목의 template 라벨 항목을 수정한다. 그리고 네임 스페이스 항목을 수정한다. #여기 수정! 이라고 명시된 항목을 확인하여 해당 항목을 수정한다.
- kubectl apply -f deplotment.yaml (실행 예시)
apiVersion: apps/v1
kind: Deployment
metadata:
  name: nginx
  namespace: nginx #여기 수정!
  labels:
    app: nginx
spec:
  replicas: 2
  selector:
    matchLabels:
      app: nginx #여기 수정!
  template:
    metadata:
      labels:
        app: nginx #여기 수정!
    spec:
      containers:
      - name: nginx
        image: nginx:1.14.2
        ports:
        - containerPort: 80
4. service.yaml 파일도 생성한다.
- spec 항목의 selector 부분을 deployment.yaml 파일과 일치 시킨다.
- kubectl apply -f service.yaml (실행 예시)
apiVersion: v1
kind: Service
metadata:
  name: nginx-service
  namespace: nginx
  annotations:
    alb.ingress.kubernetes.io/healthcheck-path: "/healthy"
spec:
  selector:
     app: nginx #여기 수정!
  type: NodePort
  ports:
  - port: 8080
    protocol: TCP
    targetPort: 80
5. ingress.yaml 파일 실행하기
- kubectl apply -f ingress.yaml (실행 예시)
apiVersion: networking.k8s.io/v1
kind: Ingress
metadata:
  name: nginx-ingress
  namespace: nginx
  annotations:
    kubernetes.io/ingress.class: alb
    alb.ingress.kubernetes.io/scheme: internet-facing
    alb.ingress.kubernetes.io/target-type: instance
spec:
  rules:
    - http:
        paths:
          - path: /
            pathType: Prefix
            backend:
              service:
                name: "nginx-service"
                port:
                  number: 8080
6. 생성한 서비스 확인하기
$ kubectl get pod -n nginx && kubectl get svc -n nginx && kubectl get ingress -n nginx
NAME READY STATUS RESTARTS AGE
nginx-6595874d85-wmhps 1/1 Running 0 9m48s
NAME TYPE CLUSTER-IP EXTERNAL-IP PORT(S) AGE
nginx-service NodePort 172.20.45.60 <none> 8080:32147/TCP 11m
NAME CLASS HOSTS ADDRESS PORTS AGE
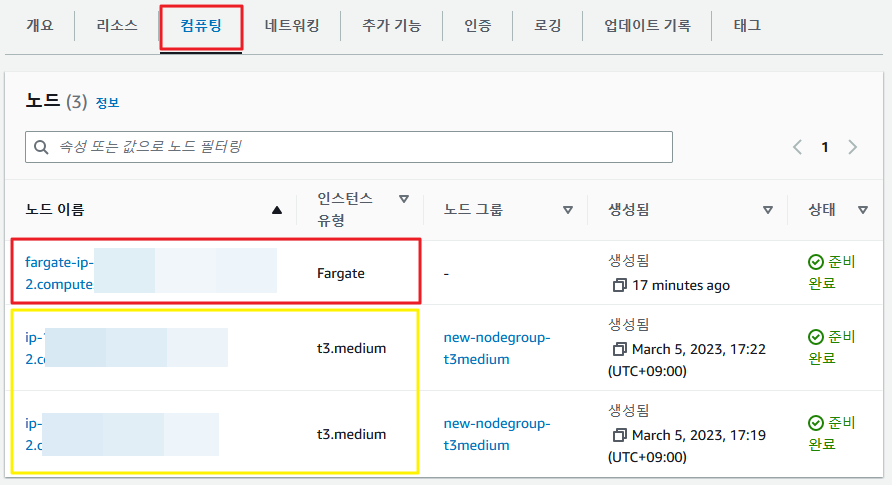
nginx-ingress <none> * k8s-nginx-nginxing-000000000000.ap-northeast-2.elb.amazonaws.com 80 5m43s- eks 에서 해당 fargate 노드 확인하기, 빨간색 은 Fargate가 실행되는 node 이고 노란색은 fargate를 제외한 나머지 pod가 실행되고 있는 항목이다.
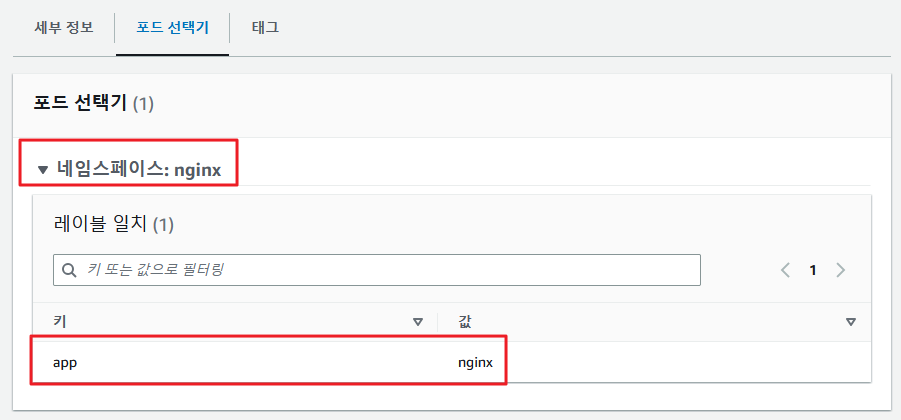
- eks 콘솔에서 fargateprofile 확인하기

- 아래와 같이 파드 선택기와 namespace를 지정하여 선택된 파드만 fargate로 실행 할 수 있다.
# Replicas 테스트
- Replicas를 조정하면 보통 pod가 늘어나거나 줄어든다.
아래의 명령어를 통해 pod의 갯수를 줄이거나 늘릴수 있다.
kubectl scale --replicas=10 deployment/nginx -n nginx중요한 점은 리플리카 숫자를 늘릴경우 fargate가 늘어나고 fargate가 늘어나는 만큼 fargate와 연결된 EC2 인스턴스의 숫자도 늘어나게 된다.
8. 생성된 ALB 주소로 Nginx 웹서버 확인하기
- 아래와 같이 ALB가 생성되어 있고, ALB DNS 주소로 해당 Fargate가 생성한 nginx의 웹서버로 접근이 가능하다.

- nginx 웹서버 확인

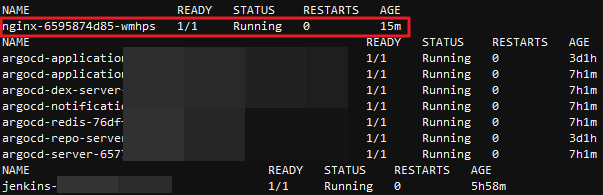
9. 결론... kubectl get pod -A 를 활용하여 모든 pod를 조회해보자.
- 아래의 명령어로 조회를 하면 3개의 네임스페이스로 조회되는 pod를 확인 할 수 있다.
$ kubectl get pod -n nginx && kubectl get pod -n argocd && kubectl get pod
NAME                     READY   STATUS    RESTARTS   AGE
nginx-6595874d85-wmhps   1/1     Running   0          15m
NAME                                                READY   STATUS    RESTARTS   AGE
argocd-application-controller-0                     1/1     Running   0          3d1h
argocd-applicationset-controller-746fbf748b-c26nk   1/1     Running   0          7h1m
argocd-dex-server-5dc8758d44-x8txk                  1/1     Running   0          7h1m
argocd-notifications-controller-5bcb68484b-mg88b    1/1     Running   0          7h1m
argocd-redis-76dff756d7-gbg2t                       1/1     Running   0          7h1m
argocd-repo-server-7764b8bd4c-ks49v                 1/1     Running   0          3d1h
argocd-server-6577cf8b7f-lpxpr                      1/1     Running   0          7h1m
NAME                                  READY   STATUS    RESTARTS   AGE
jenkins-5bf8d67f6c-l4wxt              1/1     Running   0          5h58m
- 아래의 내용중에서 nginx-로 시작하는 pod가 fargate로 생성된 파드이다.
- eks에서 fargate를 활용하는 방법에 대해서 알아보았다. workflow로 정리를 해놓자.